
Tutorial: Endless bag strap
Comments: 1
Materials needed
Needed for a finished belt of +/- 130cm at maximum length.
Outer fabric: Two straps of faux or cork leather / interfaced canvas or cotton
- Width: 2 x desired width (i.e. 50mm for strap of 25mm)
- Length strap 1 = +/- 140cm
- Length strap 2 = +/- 132cm (This piece will be the back of the finished belt. By taking it a little shorter you make sure that the seams end at the back when taking the double)
Hardware:
- 1 adjustable slider
- 2 swivel hooks for detachable strap
- OR 2 (rectangular) rings for strap attached to the bag
- (Optional): 4 double cap rivets
Useful tools:
- Double-sided tape
- Hand sewing needle
- Setting tool for rivets
Step 1: Make a long strap

- P.1a With wrong sides together, join both straps so that you obtain 1 long strap and press seam allowance open.
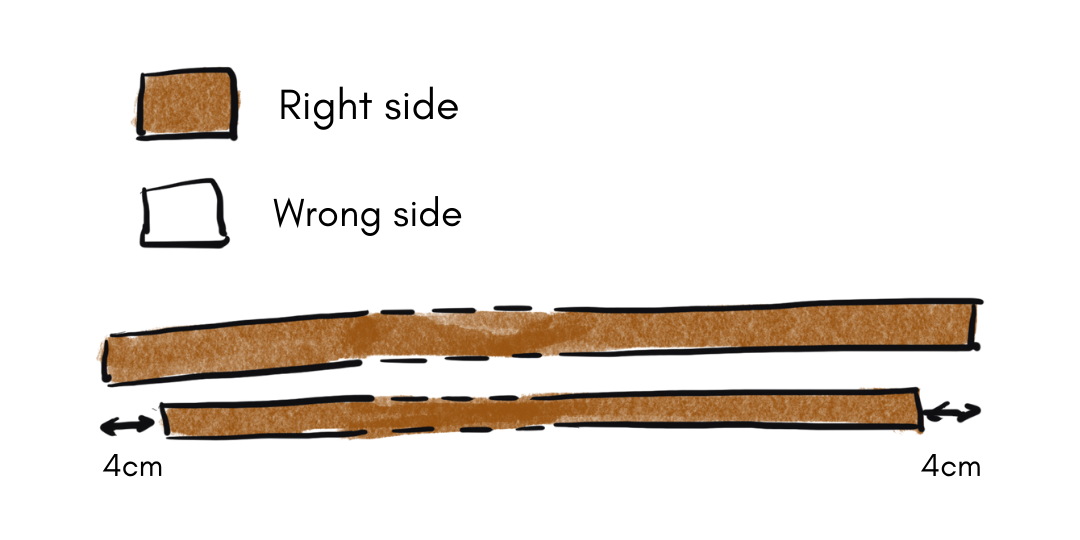
- P.1b On the wrong side, trace a line along the entire length marking the center.
- P.1c Apply double-sided tape along the entire length on both sides (see orange line). Leave about 5cm untaped on both sides.
Step 2: fold strap

- P.2a/ P.2b Fold (and tack) the straps along the entire length to the center line.
- P.2c Topstitch both sides of the strap, at about 2mm from the edge. Start 5cm before the seam on the side of the longest strap, finish 3cm after the seam on the shortest strap. When doing so, do not secure either at the beginning or at the end.
- P.2c Bring the unattached top thread to the other side, by pulling on the bottom thread, or use a hand sewing needle. Tie top and bottom threads to the back of the belt using a double knot. Cut off.
Step 3: place hardware
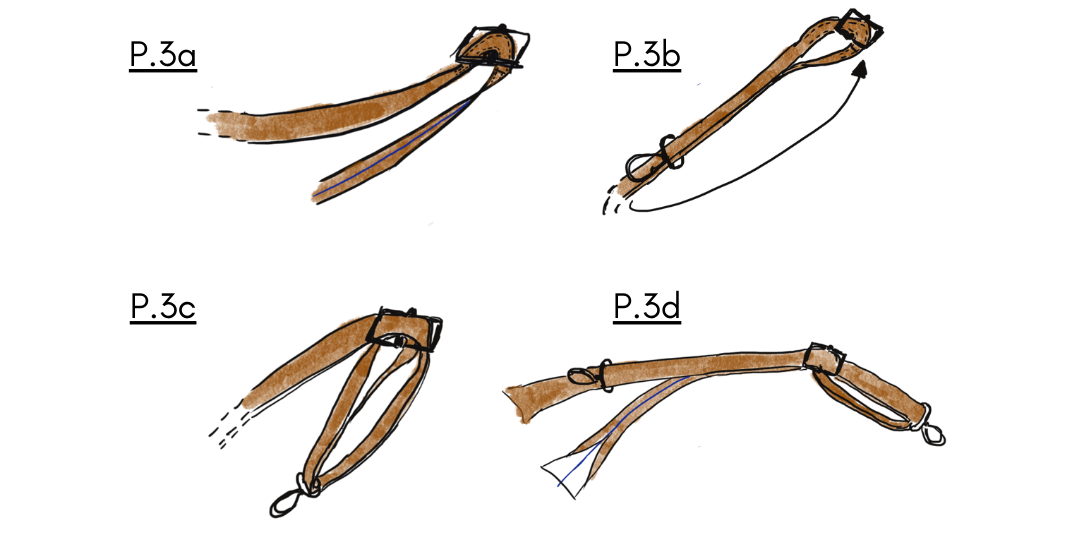
- P.3a Thread the strap through the adjustable slider so that it folds double around the center (loose) bar.
- P.3b Fold back and thread the double strap through one of the swivel hooks / rectangular rings.
- P.3b / P.3c Then thread the double strap through the sliding buckle again, over the center bar, to the other side.
- P.3d Then thread one of the strap pieces through the second swivel hook / rectangular ring.
Step 4: close loop

- P.4a Join the open strap ends together, wrong sides together. Press seam open and apply double-sided tape to both sides.
- P.4b Fold and tack the rest of the strap to the center line.
- P.4c Topstitch ( similarly to the other side) both sides of the strap at about 2mm from the edge. Again, start at 5 cm before the seam at the side of the longest strap and stop 3 cm after the seam. Bring threads to wrong side, tie and cut.
You now have one endless loop with the necessary hardware already attached. The purpose now is to sew the flattened loop along the long sides so that you end up with one long strap that has a swivel hook on the one side and an adjustable slider on the other.
- P.4d Apply double-sided tape to tack both sides together. Position it on the center line (see orange line). Start on the side of the swivel hook and make sure the seam is about 1 cm away from the fold. When you double fold the strap around the swivel hook, the stitchings you already made should match up nicely, at the top and bottom.
Step 5: topstitch

- P.5a Move all hardware to one side of the strap so that you get one loop.
- P.5b Start topstitching at 2mm from the edge, at one of the swivel hooks, as close to the hardware as possible. Try to start where the previous stitching ended. Do not secure stitch but do provide enough loose thread.
- P.5c Finish in the stitching on the side of the slide buckle. Do not secure stitch, but provide enough thread. Do the same on the other side.

- P.5d Use a needle to pull the loose threads between the two strap layers. Tie top and bottom threads using a double knot in sich a way that the knot falls between the layers. Trim.
Step 6: finishing touch

- P.6a For an extra professional finish, you can now add one or two double-cap rivets at both ends of the strap. Alternatively you could also sew a cross or horizontal stitching line as close as possible to the swivel hook and adjustable slider to secure the loops.


